
User Questions and Answers
What slicer is used with the DX printers?
Can the 465dx use both print heads at the same time to print multiple parts?
Have you done any tests with the 465DX using ABS and ninja flex for a multi-material part?
Is there a filament clog sensor?
Is there any difference in how a DX or N printer is accessed?
Why are the heaters staying on after a print has finished?
Why are parts not sticking on part of the bed?
Why is Z height seemingly unpredictable?
My printer has a problem but my Warranty and Onsite plans have expired - what are my options?
Clearing Plastic from the Nozzle
How do I fix it when it doesn’t extrude?
Can we use third-party filament?
How are the properties of PLA different than ABS? Why would one would be used over the other?
How do I print a part with PLA?
How do I fix frequent USB disconnection issues?
Can I resume a print after it has disconnected?
Conditions possibly allowing resumption
Printing the top “half” of a part when only a section got printed successfully
Reconnecting to the Printer USB Port
Using Device Manager to check the Port Number
Print Stopped before Completion
Can I use a Ninja extruder to print ABS?
How do I register a new computer with Kisslicer?
How do I send you .gcode files or large STL files?
How do I unzip the files I download from Thingiverse?
Why doesn’t the fan on the side of the extruder run all the time?
Why doesn’t the fan on the front of the extruder run all the time?
Should I have a 3.0mm driver in my kit? I see 3.0 on the spatula handle.
Do you support Cura’s newest version?
Can I recycle my failed parts and scraps?
What is different about printing PLA on a printer that normally prints ABS?
Where is your 32-bit installer package?
Restoring Kisslicer Settings to Stock
How can I tell Kisslicer to set the price per gram so it calculates the cost for a part?
How can I move the parts somewhere besides the center of the bed?
How do I load new filament into my extruder, when it won’t go in far enough?
My nozzle has clogged, and I’ve only been printing for a week with a new nozzle. Why?
Milky or Sticky residue build-up on the inside
I have a 508. How do I get PolyPronter to display the whole bed graphic?
How do I keep my computer from falling asleep while printing?
Prevent Windows from suspending the USB ports
How do I replace the whole Extruder?
Where can I find a Cart for the 508?
How do I use the Micro SD card slot?
How do I adjust the Filament Switch?
What is the Lifespan of the printer?
Why did the extruder levers crack?
How do I figure out what scale to use for a part I have downloaded?
If you know the scale for sure
If you also know the units the STL was saved in:
To calculate a final scale instead of doing it in two steps.
How can I split a large print into two or more pieces?
How Can I set a part flatter on the print bed?
Why does my print have weird lines going all over the place on the interior of the part?
What is the resolution of the video camera?
Can I disable the microphone on the Camera?
How can I tell if my extruder is heating up properly?
Why are my prints not sticking to the bed?
I can’t seem to be able to adjust Z Height and keep getting messages - what do I do to fix it?
Is there a risk of food contamination from cookie cutters when using a beryllium copper nozzle?
Do we need to use food-safe filament for making cookie-cutters?
Are there any filaments that are food safe?
What is the belt for, that connects the two Z screws?
How do I prepare my printer for the moving truck?
Can I use NinjaFlex in a regular extruder?
Where can I find models to download?
How can I scan a part to make a copy?
How do I replace the Extruder Lever?
How can I clear the extruder of a stuck filament?
How can I tell if my filament switch is working?
How do I adjust the filament switch?
What glue works best for my materials?
How do I print Carbon Nylon such as NylonX?
How do I test whether a Nozzle is partially clogged?
How do I measure Nozzle Diameter?
How can I set up Kisslicer on a Linux machine?
Why is there a line going up my part? What can I do about it?
How can I tell if my bed heater is working?
How can I slightly adjust the height of one corner of the print bed?
What settings should I use to print a Lithopane?
Why does the printing temperature vary, even though the material calls for a constant temperature?
The text window in PolyPronter has disappeared
How can I easily change colors during a print?
How can I reduce the pullup of ABS from the build plate and tape?
How can I use a more long-lasting bed surface than the PET tape?
How do I transfer custom Kisslicer settings to a new machine?
For the Web connection, does the printer talk over ports 80 or 443 and, if on 443, is it HTTPS?
What about filament splicing color changing like Palette?
How can I make a part sit flat on the bed?
What do I get by spending more money on a PolyPrinter, vs. a $500 printer?
Kisslicer is still used for all printers. The 508 settings are already in your existing Kisslicer setup, by selecting that printer type.
No. The main purpose for the dual extruder setup is to allow the use of two different materials or two colors for the print run.
Yes, just as an exercise. We printed a Ninja tire on an ABS wheel. It worked well.
If the correct choices are made when slicing (choosing the appropriate preset settings) then it works well, within the limits of the material adhesion (the support filament doesn't adhere to ABS as strongly as ABS does to ABS). We spent a long time optimizing the post-processor and slicing settings.
We use a different support material than Ultimaker.
There is semi-automated left-right leveling, with a Z adjustment knobs on both left and right sides. At the start of a print, it used both switches to make sure it conforms to the adjusters. This eliminates the need for the belt across the top of the printer.
Also, we have created "Wizards" in the web-based user interface that greatly reduce the effort needed to keep the machine in calibration. (Any dual-extruder setup requires a higher level of calibration and periodical adjustment to continue to work optimally.)
No.
No. There are two absence sensors (the Filament Switches).
Note that the normal way to use a DX printer is through the web interface. This provides a much more capable way of operating and managing the printer. It requires a wired Ethernet connection to the local network. You can then also access the printer interface from a phone, tablet, or computer on the same local network.
If the heaters are staying on when the print has finished, the upload to the printer was likely begun before the "DOS box" black window of the post-processor had finished and disappeared. The Heater turn-off is at the very end of the file, naturally, so if the upload caught up to what was being written into the file, it would have stopped uploading before it was all written out by the post-processor.
Print-sticking problems possibly stem from the Left-Right Z adjustment Procedure (Maintenance tab, Wizard needing to be run).
This problem might come from only adjusting the left Z knob and not both at once. Each knob controls the Z height on its side of the bed. So if the right side has too much clearance, turn the right knob only, counter-clockwise a bit to get the head lower when homed.
But the intended method for doing the left-right leveling is the use the "Left-Right Z Level" wizard, in the Maintenance page of the web interface.
It will lead you through the procedure, and advise what direction, and how much, to turn the Z knobs on the left and the right. You may need to do this twice if it's fairly far off to begin with.
After that, make sure all staff using the printer know that if any change is made to the Z height for preference of squish, then BOTH knobs must be turned an equal amount and direction, to maintain the left-right level.
Check the corner mounts of the bed to see if one is cracked.
If there used to be Onsite coverage on the machine, we can definitely come out and get that printer going again.
The options are:
1. We could quote on renewing the warranty ($300) and Onsite trip plan coverage ($360) and then give the whole machine a once-over and get it up to proper operation. That would also get you a full year of on-site (we come there) coverage for whatever else might happen.
2. We could quote on a service call (travel plus time and parts) if the bed needs releveling or other items have crept in there that need some attention beyond what you can handle. (We'd need to spend a bit more time by phone or email with someone there before we could be sure of all that is going to be needed.)
3. We'll help you diagnose and resolve the problems via phone or email, if someone there does the repairs. There will be a cost for parts if Warranty is not renewed.
For any of the above:
Sometimes odds-and-ends of plastic will accumulate on and around the nozzle. If left there, they will gradually harden into a black mess. It’s best to clear it away occasionally.
The one thing to watch out for is the bottom surface of the nozzle, which has the tiny hole the plastic extrudes through. The nozzle is a copper alloy, which is soft compared with any steel utensil you might be tempted to use. Never allow a steel object to touch the bottom face of the nozzle.
We therefore have a Brass Brush in the toolkit so that you can more safely snag bits of plastic off the nozzle or bed safely (your and the nozzle’s safety).
Roughly once per month, apply a very small amount of (e.g. a single drop per rod) of the green machine oil supplied in the Owner’s Kit to the rods by soaking a Q-Tip, or a small piece of folded cloth with the oil. Rub it on the rods to get just a very slight film.
Checking:
A fingertip dragged along the rods should slide smoothly with very low friction. If it seems "grabby" then it needs re-lubrication, and possibly cleaning (see below).
If the fingertip comes away wet with oil, there is too much. It takes only a very thin film to provide sufficient lubrication. The fingertip will normally show glistening without being really wetted.
In either case, if there is a visible accumulation of dark or black oil residue on the rod(s), then wiping with a paper towel and re-oiling will freshen them up.
The belts normally maintain proper tension adjustment for long periods of time.
If you notice print quality problems, like visibly worse sharp corners (ripple), you may need to look for belt tension problems.
Warning: Belts do not normally need continual re-tightening. If they loosen repeatedly, something is changing. Please let us know so we can help figure out what.
Pull the bed all the way forward toward you (use Motors Off in PolyPronter if it doesn’t want to move).
Strum the belt near the yellow attachment point. If you can feel or hear a low vibration or hum or tone at all, briefly, it’s tight enough. There should be no actual slack.
The Y belt adjustment is the hex screw facing you in front of the yellow Y belt attachment. Turn the screw ¼ turn at most, between checking for the belt vibrations.
Move the X Carriage (extruder assembly) all the way to the left (X-home or move it by hand).
Strum the belt near the yellow attachment point. If you can feel or hear a low hum or tone at all, briefly, it’s tight enough. There should be no actual slack.
The X belt adjustment is the hex screw in the center of the large stainless steel washer, facing toward the right, inside the right side door. Turn the screw ¼ turn at most, between checking for the belt vibrations.
Make sure it is kept away from the end-stop switches and the Y pulley and belt.
Extraneous plastic can interfere with switch action and carriage movement.
You can call us at 469-844-1229 for help while doing these steps, if you wish.
If it turns out to be something needing repair, we can schedule a service appointment, if you have a valid On-Site coverage plan.
The maximum spool width to make full 299mm deep prints is actually our own filament, which is about 77mm wide. However, a snap-on removable spool adapter is available if filament is used on some of the older style very wide rolls. But it then can intrude a bit on the print volume at the back of the printer (not usually a problem).
Maximum diameter is roughly 210mm.
Most third-party spools work.
Do beware of quality problems - there is a fair bit of inexpensive but poorly-performing filament out there.
We would appreciate it if you plan to at least start out using our filament so that you have a baseline to compare against when you evaluate third-party filaments, and also so that if there are problems printing particular parts, we can eliminate the filament as a variable.
The printer will be controlled from a personal computer, connected via USB cable. Normally, this is the same computer that will be used for “slicing” - converting design files in preparation for printing.
To cover designing, slicing, and controlling the printer from a single computer, we recommend an Intel i7 machine running 64-bit Windows 10 and having 16GB of RAM. But an i5 with 8GB is also a reasonable choice, though noticeably slower-slicing for large parts.
The minimum recommended computer for just running the printer is an i3 with 4GB RAM, or equivalent. One computer can be used to run several printers.
In all cases, watch out for low-end versions of computers that have e.g. an i5 chip but are running at a very low clock speed to save money. We do not recommend ones running at less than 2.0 gHz.
(for more information, see the User Manual)
PLA and ABS have more similarities than differences, but for some types of objects, those differences can matter - in a good way or a bad way.
ABS is an all-around practical plastic for most tasks. Objects tend to be durable and tough. It’s easy to remove support from, and it is smoothable, sandable, and paintable.
PLA is more brittle, but harder and more springy. It normally prints with a shinier surface gloss than ABS. It softens and can deform if left in a hot car. Some objects have been designed to take advantage of its springiness (e.g. a wind-up car) and so of course really need to be printed in PLA. It also is a “stickier” (to itself) material so it can turn out a little better in extreme overhang areas of a part, when trying to do without support. PLA has less shrinkage upon cooling than ABS, so parts tend to try less hard to “curl” up from the bed. The normal ABS extruder will print PLA just fine, but we do have a PLA-specific extruder version with more cooling fan capacity that can be helpful.
With our recommended settings, PLA parts are generally shinier than ABS.
PLA support material can be considerably more difficult to remove than ABS. People generally need to go to greater lengths to design parts that don’t need as much support. As well, more care may need to be taken to use Support settings and Style settings that together reduce the total amount of support.
To print most large PLA parts, the print bed needs to have more adhesion than the normal green PET tape that we use on the PolyPrinters. (Some PLA parts can be printed right on the green tape though.) So in general, some 3M blue painter’s tape (no other brand works as well) is first used to cover some or all of the print bed first. (PolyPrinter carries 3” wide 3M Blue Painter’s Tape.) Please note that the Blue Painter’s Tape usually needs to be replaced (in the area where prints have been made) after just 3 to 4 prints. This can get annoying.
PLA has a sweet smell that some people dislike, and some people prefer, vs. ABS.
If the part is large or tall
It may need 3M blue painter’s tape to be on the bed in the area of the part to ensure good adhesion to the bed.
If so
Select the ”PLA cold bed for blue tape” material.
If the part is flatt-ish or small
Select the PLA (Stock) Material in Kisslicer.
Print right on the green PET tape that is used for ABS.
Sometimes, when printing taller objects, there are noticeable separations of layers, just spots on corners that you can see where layers have pulled away from each other slightly. We’ve tried a slightly higher temperature for the extruder, but wasn’t sure there was something else we could try?
This has a lot to do with chamber temperature and the plastic's contraction when cooling. The contraction from cooling after solidification tries to shrink the newest layers of plastic, and each successive layer adds its own pull to that force. So it accumulates with height. Up higher in the printer, the air temperature tends to be slightly lower, causing more stress.
That combines with the same lower air temperature making the part (depending on shape) also often a bit cooler by the time the head comes around again, reducing adhesion slightly. A higher extrusion temperature can compensate for that a little.
When the accumulated stress from cooling shrink adds up to be greater than the adhesion between layers, in a given spot, then it can pull away vertically a little.
If there is any kind of direct air conditioning airflow hitting the printer, it may end up with a cooler chamber temperature than normal, aggravating the tendency. If you want to go to a bit of trouble, you can monitor the interior temperature of the printer with a cheap indoor/outdoor thermometer that has a remote sensor, and place the sensor near the left filament holder (anywhere out of the way of things). Then you can do things like drape a towel over the top flat surface of the printer to shield it from air. Just don't go over about 55 degrees C in the interior.
2. Speaking of tall objects, in a few rare instances where we’ve had to change filament while a print is halted, the next layers of material are not sticking to the already present layer, basically resulting in having to start the entire print over. Our “keep warm” temperature is 180, should we raise that a bit higher or is there something else completely?
The less time that passes between stopping and restarting, the warmer the previous plastic will be. Also, doing the filament change with the least amount of open-hood time will help keep the interior of the printer warm. I have sometimes replaced the filament but had something take a long time, leaving the part and the air cool inside, and in that case putting in the new filament but closing the hood and letting things actually warm up inside again for e.g. 10 minutes to get a somewhat warmer part temperature than would have been the case.
3. Finally, a question about PronterFace software. I’ve noticed that sometimes the Z height controls do not work for lowering the extruding, or they will work for one or two clicks, but it’ll remain unresponsive after that (which trying to lower the extruder). The extruder can still be raised along the Z height and the x and y controls seem to be fine. Any ideas?
If the printer has been reset or just turned on, it will not go below the point where Z was when it woke up. It sounds a lot like that.
If it is a new computer, make sure it’s running Windows 10, because older versions of Windows were less reliable.
If it used to be reliable, then perhaps something has become unreliable:
If the main USB cable between the back of the printer, and the computer has been accidentally pulled on e.g. tripped over, then the cable, and possibly also the adapter built into the rear of the printer may have been damaged.
To diagnose some of these issues, it may be useful to start a print, and then deliberately wiggle or manipulate each connection, to see if it immediately indices the disconnection.
Press: Windows Key to get the search. Start typing Power Options…
Set Sleep After to “Never”.
Click on Advanced settings to get the window shown below:
For “Never” you might need to enter 0 (zero) first, then it will display “never”.
***** text summary
To truly resume a print it has to be merely some kind of USB communication problem where, without resetting the printer or restarting PolyPronter, and with the machine still hot and waiting for more instructions, untouched, a Connect or a Disconnect/Connect can re-establish USB communications. In that case, on the menu there is Advanced, Recover and that can resume the printing.
If any of the conditions outlined above are not true, there's no practical way to resume.
In any case, in a lot of printing situations, once the part has cooled off the topmost layers for a while, new layers added will not bond as well as they would have had they been added immediately. As well, the part will slightly shrink or warp, so that usually there will be a visible artifact.
Some parts have a shape that provides a lot of gluing area, and in that case re-slicing the part but with a "Lower in Z" value of the height of the successfully printed portion will ley you print the upper section starting at that height, and glue the top tot he bottom part.
*********** end of text summary
Sometimes…
If:
Then:
Attempt to reconnect. If the Connect button sill says Disconnect, then Disconnect and then Connect.
If it reconnects:
On the PolyPrinter main menu bar at the top, select Advanced, and then Recover (if available).
It might just carry on with the print. (If the part has cooled (very likely) there will be a small line in the print and the part may be weaker than desired at the point where it continues.)
If a part is large, so that it’s a real shame to have to print the whole thing again, and your are OK with gluing the top section onto whatever was printed, then do this:
First just take a look and make sure that the USB cable is still properly inserted on the printer end and the computer end.
Try hitting the red Reset button on the side of the switch box under the hood of the printer.
If your computer has sound, it should "ding" with the USB disconnect/reconnect sounds.
Try to connect.
If that fails, it's likely that the USB port has changed.
Close PolyPronter, and re-start it.
Try Connect.
If that fails, look at the list of Ports - the first one will have been selected by default. If there's another one, select it, and try Connect again.
If there are more, try each one.
If that does not provide a connection, then
Summary:
You may need to check the serial port. The best way (on Windows) is to fire up Device Manager and see which port is coming and going when you press and release the Reset button. Then Make sure that's what Pronterface is trying to connect with. You can type in the COM port field.
Procedure:
If the above doesn't work, hit the red reset button inside the printer and check Device Manager again.
If that still fails, observe the Device Manager port list, and then hold the red reset button in the printer for a few seconds and see if the (or one of the) Teensy ports disappears. Let go of the reset button and it should re-appear. The port that does that is the one that corresponds to the printer.
If the last line in the log window says “Print ended at…” then that indicates that the program had sent all of the gcode lines that were available at the time the file was loaded, and it considers the print to be finished.
Up above that, in the text after loading the file, it will indicates that the file it read in had gcode going up to the height of X mm.
If that's not the full height of the part, then the most likely thing that happened is that the "Load File" was done before the black "DOS" style window, that opens during the Save process from Kisslicer, had gone away. Only when it has gone away can you count on the gcode file being ready to Load.
Yes. The ABS filament is a little more difficult to load into the Ninja extruder than the regular extruder, and it could theoretically be a problem for certain prints with tall thin spires on top, but in general it works fine.
The usual cause for that message at the start of a print is that the Z-adjustment is too low, causing the bed tape to be punctured or torn, and thereby allowing the extruder nozzle to make contact with the aluminum bed.
Try turning the Z-adjuster 1/4 turn clockwise to raise the head a bit, and re-print.
You may also need to replace the bed tape at the home area or wherever you might see that it has been disturbed.
You have a license code that is valid for all computers in the organization named in the code.
You need only enter your code using the top menu: File/Change Registration Key.
That computer should now have the “Pro” set of Kisslicer functionality. (Though for single-head printers it makes little practical difference.)
We keep a record of codes that we have provided, so ask us, if you can’t find a record of it.
Copy the Style you want to base it on, and just change the Extrusion Width to 1.0mm, and then also change the Infill Extrusion Width. If you are using straight infill (recommended) then possibly bump that up a little (we use .40 infill width with .35 nozzle. It makes it stronger without taking longer).
In order to experiment fully with the maximum build speed, you will also need to copy the ABS Material to make one you can play with.
Change the Max [mm^3/s] flow rate to 100 so that it's not unnecessarily limiting the speed. That doesn't mean that you can actually melt that much material per second though - there's a fundamental limit to how fast the heat can be transferred to the filament to melt it, and as well the number of watts we can put into the head. But using a high number will let you find the limit.
The firmware by default should raise the extrusion temperature when you try to print a lot of plastic per second. You may see a target temperature up to 275C. That helps the flow rate. You can experiment up to 290 but please talk to me about setting the Material up to do that properly.
I forgot to mention that you also need to change the layer height. The height should be between about 57% and 71% of the layer height. At 57% you should get good overhang performance, and 71% is good speed.
The new Kisslicer allows you to have a Style that will automatically vary the layer thickness between two settings, depending on whether there are overhangs or slopes. This gives a really good general speed/quality tradeoff and allows you to also use less support.
You will need to set up corresponding numbers for the min/max layer thickness, and first layer thickness, and Stepovers. If you are going from .35 to 1.0, just multiply all the existing settings by 3.
But a 1.0 nozzle is pretty likely to simply hit the maximum melting rate, since the paths will be 9 times the area. You might get better overall results using a .5 nozzle which will do 2x the current path area, and still probably hit maximum melting rate.
I do like the half-loop option, so 3.5 is a good choice.
I see you are using much colder temperatures than we normally recommend.
To get maximum flow, you will need to use at least our normal 250C setting. To raise the maximum temperature at high flow rates, add
M104 C285
To the Matl G-Code tab for the new material. It will then allow the head to go that hot (285) and flow more when called upon to do so. Don't be afraid of the high number - the filament doesn't get that hot in bulk, just a bit next to the wall of the extruder.
I forgot the Cool setting should also be changed to a higher value, to avoid slowing down too much on overhangs. Try 100 there too if you don't want it to slow down. You can reduce it later if you find problems with overhang quality.
The .6 is probably enough of a change to make a big difference. It's 3x the volume, if you change the Extrusion Widths and the layer heights in proportion (1.71x the normal values).
The 3x also corresponds roughly to the 100 mm^3/sec max volume setting.
If some parts have small single "towers" or pointy bits, the thicker extrusions _might_ need a change to the minimum time per layer, which we specify in seconds per mm of height. So "40/" means it always ensures that it will slow down if necessary so that every 1mm in height of printing takes 40 seconds.
There is a handy link here on our web site: http://www.polyprinter.com/3d-print-service/
Otherwise, please send them via the WeTransfer website, which will then allow us to download them from the WeTransfer servers.
(It's like DropBox but you don't need an account to send or receive files).
(choose the Free option)
We will get an email with a link for downloading them.
You can normally right-click on the .ZIP file and choose Extract All… which will make a folder containing all the files, by default.
It only runs once the motor and other metal parts of the extruder warm up. This normally takes a couple of minutes after the head/nozzle has been hot.
It will also keep running for a number of minutes after the print has stopped, because it takes a long time to cool back down after being hot.
There are two fans on the extruder. One is on the side, facing to the right, and cools the motor. It should come on a few minutes after the print starts, or after the head is warmed up.
The other fan is on the front of the extruder and cools the print, when necessary. (Larger parts don't need this fan to run all the time, smaller ones or small sections of large prints do. It will usually go on and off as needed.)
When the printing is finished, the fan should always be off. But if a print is Paused, the fan may continue to run (if it was running when Paused), until the printer is reset or the next print starts.
The handle labeled 3.0 should be on the spatula, yes. The printer doesn't use any 3.0mm socket size screws.
We did support Curaa 1.5, but the settings changed completely from Cura 1.5 to Cura 2.0 and it's not really easily convertible.
We do plan on supporting the newer Cura, as soon as Cura stabilizes (so that we don't have to keep updating the setup too much). We've been keeping an eye on it for a long time but they regularly (so far) make relatively large changes, which keeps it from becoming stable and reliable, from our point of view.
Creating settings for Cura
You can examine any gcode file produced by Kisslicer for the basics. All the settings are in the first section, before the actual gcode starts.
Some sections that are the Prefix and Postfix you can't read from there (encoded) but you can view them and copy them from the Settings window tabs.
Cura will have very different places to put everything, and different keywords.
Start simple.
While ABS is theoretically recyclable, PLA is not (though it eventually biodegrades in the right conditions). Even with ABS, since there's no "recycling" triangle on the parts, it doesn't work to put them in a recycling bin.
They will print PLA, but:
If you are using Kisslicer 1.6 or later, on the Misc. tab in the Settings, there is an entry box “Pause after Z: manual entry” that allows you to set the height where you want to insert any number of pauses.
Enter a height that is just a bit under where you want the new color to begin.
So if you want to change the filament after 6.5 mm and then when 20mm of the part has printed, enter:
6.49
19.9
And then Save the gcode file.
NOTE: In order for that to work, in Settings/Printer Gcode/Pause & Res tab (last tab) needs to have the pausing code in it.
Make sure the G28 (both), the M117 and the M0 (or M226) lines do not have a semicolon in front of them.
This is typically what will/should be there (with some variation):
; Pause then Resume
G1 X10 F5000
M117 --- Change the Color! ---
M0 ; pause the print - waits for open and close of filament switch
http://www.polyprinter.com/content/PolyPrinterSetup_Win32.exe
NOTE: it loads and installs 64-bit Kisslicer.exe as well as the 32-bit version.
YOu will need to go to C:\programData\PolyPrinter\Kisslicer and right-click on the Kisslicer32.exe and choose “Pin to Taskbar” and then launch it via the taskbar.
There are two basic ways:
1. Download our 64 bit Windows installation package from our we b site and re-install it. It doesn't do any harm, just overwrites the existing settings.
Or 2:
Use the window menu File, Choose and Restore Settings… to select the _reference folder, (or if that isn’t found, choose the SettingsMaster folder). Highlight by single-clicking and do OK.
The settings should be reset at that point.
To reset them after that, the File/Quick Restore can be run (now that the folder has been chosen).
http://www.polyprinter.com/content/PolyPrinterSetup_Win64.exe
Use the window menu File, Choose and Restore Settings… to select the SettingsMaster folder (highlight by single-clicking) and do OK.
All the (stock) settings should be reset to their initial values, leaving custom settings untouched.
To reset them after that, the File/Quick Restore can be run (now that the folder has been chosen).
In the Material tab there is a “Cost Calc” field. This represents the cost per cubic centimeter (cm^3) of filament.
For ABS, this volume is very close to the number of grams. Because ABS has a density of about 1.03, it is just a little heavier than one gram per cubic centimeter.
That means that the price per cc needs to be just that little bit higher than the price per gram.
So, if you want to charge $.10 per gram, you would need to enter 1.03 x $.10, which is .103 dollars per cubic centimeter.
You should then be able to see, after slicing a part, how many cc (cm^3), and how many $ as well as the usual predicted print time, in the right hand lower section of the Kisslicer screen.
(If the $ numbers are too high, check to make sure that on the Printer tab, under the Hardware tab there, the $/ hour is set to zero. If it is not zero, that cost will be added to the filament cost.)
If you have taken off the extruder lever before, then you can just do that (unhook springs, remove screw with 2.5 driver) and have a look at where the filament goes past and under the drive wheel of the motor. You may see the stub of the last filament that was loaded. If there's enough of it left, you might be able to gently grab it with the needle-nose pliers and pull it out (nozzle must be e.g. 230C).
If there's not enough to pull it out with, then cut a piece of filament, straighten it out, and (with hot end at 230C) use the new filament to push on the stub squarely so it get pushed down into the hot end, and is no longer in the way of loading new filament.
If you are not confident of removing the lever, please call us at 469 844 1229.
Nozzles can clog at unpredictable times. It's very difficult to determine exactly why a particular nozzle has clogged. Sometimes it's from some dust that has gotten on the filament and gotten dragged into the nozzle. Some are probably from carbon building up inside the nozzle and then breaking loose at some point. And others can be from filament that contains the occasional small particle larger than the nozzle size.
In general, if a print fails mid-print because of an audible clunking noise and a failure to extrude plastic, then it's very likely that the cause is a clogged nozzle. This can potentially (but rarely) happen only an hour or two after a fresh nozzle has been put on, if something comes through and clogs it.
If the printer was busy for a week since your previous clog, that's not all that unusual, if still not desirable.
You should find that as an average, it should be just an occasional nuisance. If it does occur markedly frequently on average, then there may be some factor contributing to that, that might be discernable.
If the print failure is not accompanied by a clunking noise, and the filament will still extrude with hand pressure or with a Flush, then the nozzle is not completely clogged and there may be some other problem. Partial clogs can also occur. Please call if this sounds like what may be happening.
Use a new micro-fiber cloth with a non-ammonia, evaporating cleaner like an eyeglass lens cleaner, or a non-ammonia window cleaner.
The plexi gets covered over time with condensed vapor and smoke. It's a sticky residue, rather than scratches that can be taken out by polishing.
If it is cleaned off frequently, when it’s just a light film, it can sometimes be gently rubbed off with a micro-fiber cloth. The cloth should be brand-new if possible, to avoid any particles in it that can scratch the soft hood plastic.
The best thing we have tried is dishwashing liquid on a micro-fiber cloth, gently rubbed to dissolve the residue. But then you have a soap film that is hard to rinse off without taking the hood apart.
You can experiment on the side doors. (At least those are easily rinsed off.) We have used various commercial cleaners (Krud Kutter, Simple Green, and citrus based) over the years. Each has some effect, but we have not really found any one thing that stands out as the single best, easiest way to get things clean. If it's too strong, it will attack the plexiglass, or even the ABS of the hood. Too weak and you just get a giant smudge.
If the cleaning process ends up with residue-free plexi, but scratched, then of course the headlight cleaning kits might work.
If you _really_ want it clean, we will sell replacement panels. It's some trouble to replace the main hood panel, but the sides of the hood are easy.
Covering the residue with clear packing tape on the inside can give some added clarity, but don't leave it on so long that the adhesive hardens (We don’t have a good guide for how long that is - probably varies by brand.)
Large pieces can of course be picked out by hand. But to really get it cleaned out you will need to use a small-crevices adapter on the end of a hose vacuum.
First, make sure that the graphic window isn’t too wide, by moving the light gray “sash” that divides the graphic area from the log window to the left, if necessary (shrinks the graphic window, widens the log window).
In PolyPronter, Settings, Options, Printer Settings
Change the Width field to 508
Press “OK”
Close PolyPronter, and restart it.
If you can’t see the log window:
It looks like the "sash" that locates the log window has moved far down the screen.
You _might_ be able to pick it (a grey bar) up and drag it upwards, if you make the PolyPronter window as tall as possible so that you start to see the top of the log window.
The sash will be just below a button marked "+" and just above the edge of the log window. It's a very light gray.
It's just above the ">" button.
If you can manage to see it at all, drag it up and things will improve.
In Windows 10:
Hit the Windows key on the keyboard, and type “sleep”. Choose the “Power & Sleep Settings” item.
The main thing is to make sure the PC doesn’t go to sleep, thinking you are not using it.
Make sure the Sleep setting is like this:
On the right side of that same settings panel, click on the “Additional Power Settings” link:
For best results, set the power plan to High Performance:
The above settings should result in the ability to run long prints without the computer going to sleep.
If you get messages like “USB Device Not Recognized” then one additional setting may be useful.
The same panel above with “High Performance” also has, on the right, “Change Plan Settings”.
Click that, and then choose “Change Advanced Power Settings” from near the bottom of that panel.
Expand the USB Settings item, and set the USB Selective Suspend setting to “Disabled”.
Then press OK. It should help.
(see https://docs.google.com/document/d/19RTzNtdFFFBCazd9OuQz7_TWGhXv_9E3pmwhv0SN5BU/edit
)
Tool Needed: 2.5mm Hex Driver
The 508 is larger than most Media Carts. The $450
Rubbermaid Commercial Electronic AV Cart, 3-Shelf, 33-Inch
is wide enough, but only deep enough to support the rear four feet (which is sufficient but will look weird).
You might find some kind of roll-around office work table.
Make sure all four wheels lock, because the printer will definitely make it "walk" otherwise.
You will probably get better print quality if the printer sits on a more solid (unshaking) desk or table.
You can copy any gcode file(s) onto the card by using the adapter that it normally comes with, or a usb card reader that has a slot specifically for the Micro SD.
After copying onto the card, either wait 10 seconds, or go to My Computer and right click on the card’s drive letter and choose Eject.
Take out the card, and then, at the printer, pull the bed towards the front of the printer to make some room.
The card slot is adjacent to the bed, towards the rear of the electronics board. There is a cutout in the blue board-cover, exposing the small silvery Micro SD card slot. Carefully slide the card into the slot and make sure it is seated firmly. Some PoyPrinters have slots with a “click” type slot, and some do not.
Then back at PolyPronter, press the “SD” button:
Choose the file you want to print, from the list that should be displayed, and press OK.
The print should start.
Once it has started, it will continue to print, even if the computer is disconnected.
This means that one of the following conditions probably exists (in order of decreasing probability):
This switch needs adjustment, if it triggers during printing without any apparent problem unspooling filament.
There should be a message in the text log window of PolyPronter that says "Filament Problem" and it'll resume when it again senses filament. (on a DX or N printer with the web interface, a message box will pop up).
You can make it "see" the filament better by turning the adjustment screw 1-2 turns.
The small yellow lever that rides above the filament as it goes over the wheel has a tiny screw inset into a hole in the bottom surface of that lever.
With the filament switch fully open (wheel dropped down), locate the (quite small) hole in the bottom side of the tip of the sensing lever. It can be difficult to see the first time. Inside that hole is a tiny screw, that you will not likely be able to see at all. IT points upwards and sticks up through the lever just a bit, to activate the metal lever on the switch above it.
Use the 1.5mm driver from the toolkit, and line it up with the screw head and twist a little to get it to insert.
Using the 1.5mm driver, turn that screw clockwise about 1 turn to make it less "picky". Try that. If it occurs less frequently but is still an occasional bother, try another 1/2 turn. It could possibly take 2 turns in total, but should not require more than that. (Turning it too much will make it fail to notice the absence of filament when the end of the spool is reached.)
The nominal lifespan we think is reasonable to assign to the printer is about 10,000 hours of printing time. By that point it is very likely to require at least a thorough refurbishment at our shop. It will also probably be visually unappealing. Along the way, it will need some maintenance and repair from time to time.
But, like a car, the printer doesn't necessarily have a specific, finite lifespan, because it is very repairable and rebuildable.
A key point about our extended Warranty and our OnSite plan is that if a printer has those coverages on them continually, then the lifespan of the printer is indefinite, because we will simply keep the printer in good functional condition as long as the coverage is in place, regardless of what may need to be done to the printer. This amounts to roughly $2/day per printer at this time, to provide an ongoing 3D printing facility, if you think of it that way. If that keeps a lot of patrons happy, it may seem a very reasonable cost.
We are now printing the levers in PETG and expect the cracking problem to go away with that change.
The levers never used to break at all, for years. But somewhere along the way, I think the yellow pigments used in plastic (we've seen the change in another brand we tried) have changed composition in some minor way that makes the plastic more susceptible to fatigue cracking than it used to be. We of course abstractly know that adding anything to a base stock is bound to change its characteristics somewhat, so that all colors of ABS must be slightly different from each other. But this is one case where as far as we can tell, it has a noticeable impact.
We had made a number of design changes when we first saw the problem, and each change has seemed to improve, and nearly eliminate the problem. So the "9C" version is better than earlier ones but has proven not to be a permanent fix.
We'd also tried printing them in PETG as a test, in parallel. But we recently got our own PETG done in the correct color, and now that we can also print them in our new dual-extrusion machine (currently in Beta, see web site), they are practical to substitute for the ABS levers in quantity.
To go from Inches to mm, we need to multiply by 25.4
That particular conversion is easy: In Kisslicer, after the part is loaded, you can right-click on the thumbnail of the part, on the right hand side, and choose Inch-> mm. This will scale the part up by 25.4x.
But that leaves the part in its as-designed size. In this case it's whatever scale to the real world it was designed in.
So
<STL unit conversion factor> is 25.4 (STL units in Inches, 3D printing in mm)
<design fractional scale denominator> is e.g. 36 if it was designed to be 1/36th scale.
<desired fractional scale denominator> is 72 if your end result needs to be 1/72nd scale.
Together, from the part as downloaded, that would be: <STL unit conversion factor> * ( <design fractional scale denominator> / <desired fractional scale denominator> )
So if it was designed in e.g. 1/32nd scale, then:
Conversion factor: 25.4 * ( 32 / 87 ) = 9.34253
So load part, then use right-click menu, then Scale By X and enter 9.34253, would give an overall 1/72nd size - but only if it was 1/32nd scale as-designed. Hopefully the part is documented on Thingiverse (I did not note which one it was.)
Most Windows10 installations have got a Microsoft program called 3D Builder.
It's got an odd user interface, but it's fairly easy to learn how to cut models up with it.
Hit the Windows key on the keyboard and type 3d. It should show up. Open it.
Click Open, and then Load Object (lower left) and choose the STL file you want to adjust.
At the top, click on Import Model.
(If you see a red outline below the mode, there is an oddity in the file. Click on the window in the bottom right corner to repair it. It can take some time.)
Click on the object. It should now be outlined in blue.
To split the model, do Edit, Split - usually you need to select "Keep Both". Then delete one half, and do Save As e.g. "half A". Then do Undo to get the deleted half back and delete the other half, and Save As "half B".
Then you can separately load and slice each half in Kisslicer.
It's also a good tool to help rotate odd shapes at funny angles to sit flat on the bed. ("Settle" tool.)
https://developer.microsoft.com/en-us/windows/hardware/3d-print/3d-builder-users-guide
You can use 3D Builder to set it flat. 3D Builder is included with most Windows 10 installations.
Hit the Windows key on the keyboard and type 3d. It should show up. Open it.
Click Open, and then Load Object (lower left) and choose the STL file you want to adjust.
At the top, click on Import Model.
(If you see a red outline below the mode, there is an oddity in the file. Click on the window in the bottom right corner to repair it. It can take some time.)
Click on the object. It should now be outlined in blue.
Click on Settle on the top menu. The object will “fall” to the “ground” and sit either flat, or on three points.
If you are not happy with what it did, you can actually “flick” the model around with the mouse somewhat, which may give you something better.
If nothing seems good, hit Cancel. (After you Cancel you can use the rotation tool at the bottom to rotate the part in a controlled fashion and then try Settle again.)
Save the part in its new orientation by clicking on the leftmost menu item (triple horizontal line icon) and Save or Save As…
https://developer.microsoft.com/en-us/windows/hardware/3d-print/3d-builder-users-guide
The STL file probably contains geometric problems, confusing Kisslicer.
When you load a part into Kisslicer, if you see any red triangles or lines, it's almost always going to result in some geometry problems.
These might be internal to the part, so not noticed on loading.
You can check this part by loading, slicing, and then using the Models&Paths or the Paths view radio buttons at the top of the window, and move the layer selector slider down to see if any layers have those weird lines drawn.
If they are drawn in Kisslicer, the printer is merely following the instructions it was given.
You may be able to rectify the STL file’s problems by loading it into 3D Builder (Windows app) and using the Repair function.
The PolyPrinter video cameras before approximately 2018 were Microsoft VX-800, about 640x480 (“VGA”) resolution
Newer machines have an HD Logitech C270 camera with 1280x720 resolution. However, picture quality is sensitive to focus, which is not normally adjustable and is slightly off as the camera comes.
This can be done, if the camera is partially disassembled and the wire to the microphone cut through. Otherwise, taping or gluing the microphone to render it insensitive could be done.
The extruder normally takes just about two minutes at most to reach 230C if you just manually set the temperature.
But when printing, the gcode is set up to first bring the extruder to 180C just to get it warm, then it waits 6-8 minutes for the bed to reach full temperature (for ABS), and only then is the extruder brought all the way up to 260C, immediately before printing. That should take less than one minute.
The most usual cause is simply the Z-height adjustment. So always check that first, by doing a Paper Test.
If the Z-height adjustment was done correctly then there could be some other causes:
If printing ABS:
- Fingerprints on bed tape - this will create areas of non-stickiness
- worn out/scratched up bed tape
- under-extrusion (problem with extruder drive, nozzle clog etc.)
- wrong slicer/material settings - make sure bed temperature is 110C when printing. You should check your Material selection in Kisslicer, and make sure it's set to .ABS (see the Extruder Map, or the summary in the upper right corner of the graphics window).
Then also make sure the .ABS bed temperature is still set to 110 C in the Material setting details itself.
If printing PLA:
- use only genuine 3M blue painter's tape, on top of the green PET tape (to protect aluminum surface)
- use fresh tape
- under-extrusion (problem with extruder drive, nozzle clog etc.)
For mystery situations like this, it's often useful to, when you adjust it, note the "hour" the pointer on the yellow Z adjuster knob points to each time, and see if you are just bouncing back and fort between a few positions, all centered around one region, or if you seem to be chasing it in one direction, on average.
But since you describe it being too tight and too loose, I think it's best to "reset" the overall setting and then approach it anew.
If you are currently still getting fresh messages about the Nut Switch or Bed Contact (probably followed by Re-Home Z type messages, then turn the Z adjustment knob 5 turns Clockwise, go up 10mm or until the head is visibly clear of the bed, and re-Zhome.
If the nozzle still touches the bed after being Zhomed, go up 10mm give another 5 turns Clockwise and re-Zhome. (If it's really far off you may need to do this yet again.)
https://www.moldmakingtechnology.com/articles/are-copper-beryllium-molds-safe
The nozzle wears so slowly (over e.g. maybe months) and only in a short channel just before the filament exits, so that any given 3D print would have possibly only nanograms of beryllium at most. And then it still has to migrate from the print to food, and that would at most be perhaps picograms I think, if it did at all (it'll be stuck or embedded in the plastic.
The bigger risk from 3D printed cookie molds is from food getting stuck between the layers, where there's a groove. If left there, and kept moist, there could be mold or at least old dry dough there. I think a good cleaning with a toothbrush would clear that up if it was a concern (my untested opinion).
We think that ABS can be used for this purpose, because the duration of contact witht he food is in our opinion so short that there is very little opportunity for any transfer of anything from the cutter to the food.
We see food-safe as really mattering for storage of food, or for hot beverages, for example.
You could use PLA or PETG and get an additional margin of safety.
Possibly, coating the cutter in cooking oil or butter would keep the food from even really contacting the cutter, but then those substances will be in contact for a much longer time, so could end up transferring more to the food.
Clear or colored urethane paint would seal the plastic off. I am not sure if paint is an improvement over ABS, though, because paint has a lot more things in it.
Things like Lego bricks and pen-caps, which get chewed on, are ABS, and I doubt they are explicitly food-grade.
All of the above is strictly opinion, not a guarantee.
There are two categories of "safe". Once would be the general type of plastic, and the other would be an officially certified "food-grade" or "food-safe" filament product (presumably from one of the materials in the first category).
PLA is generally in the first category, and so is PETG filament, and HIPS which we also carry. However we do not carry any filament from the second category. It is available though, from other sources. There are actually a couple of certified ABS filaments too.
I think (personal guess) that the second category starts to be important when the 3D-printed part is going to be something that is used as a container or other item that is going to remain in contact with food for a long time. If on the other hand, the 3D-printed item is a cookie-cutter that only very briefly touches the food, I don't see how there's much potential for any transfer of chemicals to the food, even for example with ABS. I suspect that simply coating the 3D-printed part with oil or a nonstick spray would possibly end up with even less effective transfer (not sure).
Beyond the filament itself, there is also a potential concern with 3D-printed items because they will have fine ridges between all the layers that could trap food particles similar to how a scratch in a plastic food cup or dish can. If the particles somehow survive the washing process and then remain moist (for example) there could be some potential for mold to grow. I'm not sure if this is a real risk, but if it is, then a 3D-printed part has a bigger risk of it because the whole surface is like that. It might need to be scrubbed or brushed to get it more clean, between uses. (Possibly that cooking spray idea could help too.) Smoothing the print with a coating or a solvent should also reduce or possibly eliminate the grooves.
So, I think it depends on exactly what use the printed parts will be put to that determines the real answers from a practical point of view. From a meeting-regulations view, I don't know if you can avoid needing at least the certified food-safe filament.
https://formlabs.com/blog/guide-to-food-safe-3d-printing/
- see the section near the bottom of that page "Food Safe FDM materials"
https://filaments.ca/products/true-food-safe-pla-black-licorice-1-75mm?variant=12357714739253
That belt keeps the two sides of the Z screws loosely coupled, so that if the motors ever were inclined to drift apart in position (resulting in a tilted X carriage) the belt stops them.
Under normal operation, both motors turn identically, and the belt is of no consequence. THat is why it can be slack, compared to the other belts in the printer.
Home X, Y, Z.
Use zip ties to tie the bed all the way back. You can go around the aluminum bar that runs in front of the bed, and the right hand vertical smooth rod.
Then also gently zip tie the front X smooth rod on the left and right, to the same aluminum bar. This will hold down the whole X assembly.
Get a roll of cling film and wrap it right over the printer going from the back panel, over the top panel toward the front, right down the hood, and under the printer, and up the back again. Put some good tension on it. It's easiest if you can find a place to put the printer where each side is on a table but the middle is unsupported. You can then wrap it as described above in a continuous spiral like a mummy. This wrapping will add a lot of strength and integrity. Make sure the left and right extremities of the hood are wrapped. Once the hood is nice and snuggly, add a wrap around the length and width of the printer, and one around the height and width for good measure.
All of that should serve to make the printer able to be fairly safely handled as a solid object
After that the biggest danger would be from being dropped (of course) but also pressed on heavily from the top, front, or side, in the middle of a panel or the hood, because the plastic will crack.
The correct settings for temperature etc. are in the NinjaFlex Material choice in Kisslicer. Select that when slicing.
The speed needs to be 40mm/sec or lower (especially with a normal extruder).
If you are going to try to use a non-tuned extruder, you might need to Copy the Material and lower the Max [mm^3/s] setting from the normal 3.5 for NinjaFlex, to a lower number reflecting the actual capability of the extruder you are trying to use.
MyMiniFactory
Yeggi
Cults3D
Thingiverse
One way is to take a lot of pictures, and then use a tool that computes the 3D shape from the information in the pictures.
For example: Meshroom
https://sketchfab.com/blogs/community/tutorial-meshroom-for-beginners/
https://www.gamefromscratch.com/post/2018/10/18/Creating-3D-Models-From-Photos-Using-Meshroom.aspx
https://www.youtube.com/watch?v=k4NTf0hMjtY
It looks a bit daunting to learn and use, but depending on the importance of the scan to you, or how often you need to do things like that, it may be worth investigating.
Push the aluminum spacer out of the old one, and the springs will come out.
Then insert the spacer partially into the new lever, insert one spring, and lock it in with the spacer. Then insert the second spring and push the spacer in the rest of the way.
TLDR:
or:
Pretty much any micro switch will work there, though might need slight adjustment.
But they have been very reliable for us - I don't know of a single failure of the actual microswitch, at all (not that it's not possible).
To test - have the printer connected to the computer, and look at the text log window. Remove the filament, and flick the small yellow lever that activates the microswitch, up and down. If you see "Filament OK" and "Filament Problem" for each flick up and down, the actual microswitch is probably fine.
Other possible problems:
- frayed wire on the push-on terminal(s)
- adjustment needed for filament detection diameter (tiny screw in the sense lever, takes 1.5mm driver).
Is this regarding the filament sensor wheel at the top, back of the printer? If so, it's an easy adjustment. (And there should be a message in the text log window of PolyPronter that says "Filament Problem" and it'll resume when it again senses filament.
The small yellow lever that rides above the filament as it goes over the wheel has a tiny screw inset into a hole in the bottom surface of that lever.
Using the 1.5mm driver, turn that screw clockwise about 1 turn to make it less "picky". Try that. If it occurs less frequently but is still an occasional bother, try another 1/2 turn. It could possibly take 2 turns in total, but should not require more than that. (Turning it too much will make it fail to notice the absence of filament when the end of the spool is reached.)
For ABS, “crazy glue” (cyanoacrylate) works great. You can also use plain Acetone, or mix some ABS with acetone to make a thicker glue, or filler.
https://i.redd.it/8li9y7mntlx21.jpg
Firstly, regarding the bed material. I've heard that a glass bed is highly preferable. Is the PET tape bed going to be okay?
Yes, we print NylonX on the PET tape.
Should I add another layer of PET tape before the glue stick so that the mess isn't so hard to clean?
Yes, add a layer.
If so, do I need to worry about the z offset being a little higher from the extra layer of tape?
Possibly. One layer of tape + glue isn't a lot of height. We generally re-apply the second layer tape before printing another Nylon part, if the tape has been pulled up at all. If it's still flat (no bubbles) then you can apply fresh glue. After about twice, it starts to get too thick and uneven, so re-taping is usually called for. (Scraping etc. get messy with white powder from the glue.)
For my final product, I'm looking to maximize print quality, and I was hoping a .2mm layer height and 100% precision would accomplish that. Are there any recommended settings for NylonX that I should be aware of? Is there a certain way my settings should be to get good first layer adhesion?
The Nylon will want to curl up off the bed, so most often, using e.g. Normal with Brim for support is useful if that happens. But some parts work OK with out a brim so just try it, first.
Lastly, are the recommended temperature settings of 260 for the nozzle and 70 for the bed usually good on the PolyPrinter, or do people usually find that a different set of temperatures works for them? I'm afraid of doing a bunch of test prints and wasting filament, but it may be that I just need to see what temps work best on ours specifically.
Below is a screenshot of the settings we have used for prints that are fairly large and need high temperatures to ensure good bonding between layers. The bed temperature is high to reduce the curling-up.
If you find that for smaller parts they look "melty", then I'd reduce the Main temperature or the Bed temperature.
Make sure you Copy the Material in Kisslicer so that you have your own setting and aren't changing the common settings for others.
Ed
On the Matl Gcode tab:
;NylonX - material-specific G-code
M104 L<TEMP-30> C290 F7
That is just a warning that the amount of computer RAM needed to perform the slicing is relatively large.
It's based on the overall dimensions of the object(s) on the bed, when slicing.
If the numbers it shows are a high multiple of the actual RAM in the computer, it may seem to completely take over the computer while it slices.
In this case, the slice is predicted to need 7GB of RAM, and your computer has 8GB. It will warn you when it predicts over 4 GB.
But it virtually never actually needs as much as predicted, and your computer has a way of shuffling the RAM in ways that increase the amount of logical space for the slicer to operate in - this is slow, but works.
You can just use "Continue, and disable..." to carry on with the slice.
To measure nozzle diameter, heat to 230, clean off the tip, and press the yellow extruder lever to release the filament, then push down on the filament by hand just enough to make about 50mm come out of the nozzle slowly, taking say 4-5 seconds. Measure with the wide part of the caliper jaw. A new .35 nozzle measures around .37 to .39 mm - the extrusion always swells.
You will need to go to the Kisslicer web site and download a copy directly. Then you will need to take the settings from a Windows machine and copy the files to a specific place on your Linux machine so that it understands the correct settings for the PolyPrinter.
To get Kisslicer:
http://www.kisslicer.com/download-v16-stable.html
Install it and run it once. You do not need to go through all the steps of the printer settings configuration. We just need to start Kisslicer up and then shut it down again to create its default files.
To get the settings files from a Windows machine:
Go to C:\ProgramData\PolyPrinter\KISSlicer and copy these folders to e.g. a USB key:
_materials\
_printers\
_reference\
_styles\
_supports\
*.lua (all files ending in .lua)
You will then need to figure out where in the Linux machine the Kisslicer setup has been placed.
I.e. search for _printers for example.
You will also need to have a copy of the Lua programming language on your machine:
Probably:
$sudo apt install lua5.3
On the command line will work.
Otherwise, see here: https://www.tecmint.com/install-lua-in-centos-ubuntu-linux/
Make sure Kisslicer is not running. Then copy the files from the Windows machine overtop of the existing files.
Start Kisslicer. Make sure that the Printer Profile that is selected is PolyPrinter.
Load a file and slice it and save it.
If there is no error, then all is probably OK.
This is somewhat inescapable. At some point on each path around the outer perimeter, it needs to stop and raise the head. Tkis does create a visible seam.
In Kisslicer, thre's a dial control that will help position the seam to a hopefully less obtrusive location, if you move it to a specific location on your part. Generally, one of the rear corners works well. But on a round shape with no corners, it'll need to be plain as day on one spot.
Kisslicer can place the spot randomly, too, by setting Jitter to be non-zero, up to 360 degrees of direction variation, but I find this worse than a straight seam.
With this one you'll need to cut out the center of some of the trays so that you can put rolls of filament inside:
It's the cheapest, simplest (no timer).
This one is fancier, will turn off after set time.
https://www.amazon.com/Presto-06303-Dehydro-Electric-Dehydrator/dp/B07G919C6V
The basic test (to avoid depending on just printing temperatures):
1. Make sure that PolyPronter is "talking" to the printer e.g. will it go upwards if you hit "Z+10"?
2. Select or enter 110 degrees in the Bed temperature dropdown box and hit Set right beside it.
3. Watch the reported temperatures for Bed: below that, to see if they start climbing.
If not, then yes, the bed is failing to heat for some reason. The printer will need service.
Each bed corner’s height is controlled by two opposing adjustment screws - one (visible at edge of rail) holds it down, and the other (under the rail) pushes up.
MAKE SMALL CHANGES AND TEST THE RESULT!
To make a slight adjustment:
Use the 2.0mm driver and a pair of pliers to loosen the crosswise screw with nut that runs horizontally through the end of the bed rail, through the yellow bed mount. It just needs to be loosened enough to rattle (not pinch the rail).
To lower the corner (for more Z clearance):
To raise the corner (for more Z pinch):
Then tighten the crosswise screw again, and test the result.
This is one case where using thin layers is beneficial.
Copy the Art style (name it e.g. Lithopane). Keep the first layer at .25mm, but reduce the minimum layer thickness value to perhaps .05mm.
This will allow a smoother variation in brightness shading values than a coarser layering. Of course, it will take longer to print.
You might want to cut the image down to a small section of the overall image, for testing. It's probably worth testing .05, .07, .10 for example, to see if it actually makes a visible difference.
Kisslicer should predict the print times reflective of the layering.
The PolyPrinter has Smart Temperature Modulation. It varies the temperature of the hot end block to provide a consistent exit temperature for the melted filament. When printing sections of the part quickly, it takes a higher temperature than e.g. 210 to heat the PLA up to 210. It doesn't spend much time in the heated area, and has to go from say 25-30C all the way to 210C in a short time. The faster the printing it's doing, the shorter the time. And when it needs to slow down, like doing a tiny tip of the top of a tapered part, you will see that it goes down to 180 to 190C which is appropriate for doing that.
So don't worry - the modulation algorithm has been set up to provide the most consistent melt temperature across a lot of different speeds and conditions, and what you are seeing is the variation in setpoint it needs to have in order to achieve that end result.
Try to find the separator bar that has probably been accidentally dragged off to the right side of the main window, hiding the view area for the text log window. Maximize the PolyPronter window to be full-screen and then hover over the right side window border and slightly to the left of that,and if you get a left-right arrow, drag it leftwards.
If that doesn’t work, try deleting the:
.pronsolerc
and
.pronsolerc~bak
files from C:/users/<user name>
The easy way is to manually open the filament sensor by pulling the wheel down, stopping the printer. The head will park at the left side.
Then remove that filament.
To use the new color, first put the spool into place WITHOUT closing the filament sensor wheel on it. Cut a new end, and insert it into the extruder.
When it is completely in the extruder and ready to print with, then you can close the sensor wheel on the filament. The print will resume.
ABS simply does shrink. There is a limit to what you can do to avoid it.
It's better for the part to stick to the tape than fail to adhere.
Retaping is definitely necessary at some point.
Sometimes you can re-orient the part somewhat to at least get the pulling-up points to not be near a tape seam.
Use a support style like Normal with Brim, and use a .5mm brim thickness to help increase the adhesion area and reduce pullup somewhat.
If you must print the same part repeatedly, you can possibly slicer several versions with different position or orientation on the bed, to exercise different parts of the tape.
If you can change the part design, try to radius all sharp corners - it won't pull up near as much. Pullup is worst where two vertical edges/walls meet.
We have had success with a 1 to 1.5 mm yellow PEI sheet. (Beware Chinese "PEI" that is clear - I am not really sure what material that is).
The 3M high temp adhesive must be used - it's a pain to get solidly down across the whole sheet but it can be done. We have used a hard acrylic roller and starting at e.g. the front edge of the bed working backwards 1/2" at a at time making sure there are no bubbles. It requires a lot of pressure to get full adhesion. You must support the front of the bed if pressing down, with an equivalent counter force.
The secret to using it in the long run is that you must also use a border of PET tape e.g. 1/2" wide all the way around all the edges or else parts will just pull the entire PEI sheet up!
If the surface gets scratched up you just sand the PEI with 600 grit sandpaper by hand to dull and smooth it.
Eventually, it'll still pull up somewhat and need to be replaced or re-applied (new 3M adhesive). This is a huge pain in the butt, because the 3M adhesive only reluctantly dissolves with Goo-Gone etc. This is why we generally avoid recommending the PEI bed surface. The other reason is that parts are quite difficult to remove if they are flattish and have no natural edge to get a removal tool under the part with.
Make a copy of these two kisslicer folders under C:\ProgramData\PolyPrinter:
_styles
_supports
Then use our install package for Win10-64 to get all the software.
https://www.polyprinter.com/content/PolyPrinterSetup_Win64.exe
Once the software is installed on the new machine, copy the contents of the saved folders into the new installation folders of the same name and location.
If prompted whether to overwrite, choose "Skip".
Right-click on the thumbnail in Kisslicer, and choose Transform, then Mirror X or Y or Z (any single one will have the same effect, but result in different final orientation).
You can then, if you wish, use the menu File, Save Packed STl command and save it under (name) mirror.stl as a mirrored copy that you can load later.
To print both normal and mirrored you can just then load the original as well.
For the web interface, it talks on port 80 by default, and does not use HTTPS.
This type of filament splicer can work but in our experience (with an older version) it was much more troublesome to use than it should be.
When it is all set up, calibrated, and tuned the result can be quite good.
But getting to that point was difficult.
After that, it was still not something that would repeatedly work without constant attention. There were still many failed prints for one reason or another.
It is possible that newer versions of that product have become much more reliable to use. But we do not know if the newer version can work with our printer.
We do not recommend the use of this device with our printer, and we cannot help at all with using it with our printer, sorry.
https://www.mosaicmfg.com/products/palette-3-pro
Use the 3D Builder that is/was part of Windows a fair bit for oddly-angled parts that don't sit flat, to "plop" them onto the bed.
Use the Object/Settle feature. It applies "gravity" to drop the part so that it has at least three points of contact. You can kick the part with the mouse, or else use the other rotation tools to pick which overall orientation you want to apply the gravity to.
How to replace the Yellow Extruder Filament Lever
Find the 2.5 mm hex driver that should be in your Toolbox.
Unhook the two side springs from the right side of the aluminum block. It may help to put one finger above, and one below the spring when pressing them leftward. Start with the front spring, so you will have more access to the rear spring after that.
Loosen the pivot screw at the top right of the lever, using the hex driver. Remove the whole assembly, with Lever, Springs, bolt, and aluminum spacer together.
To transfer the springs, spacer, and bolt over to your new lever, you will first need to make careful note of the way the springs are positioned in the old lever. Take a picture if necessary.
Remove the bolt, and then push out the spacer using the hex tool, This will release the springs.
Push the spacer partway into the new lever, so that it is just held in place by the frontmost wall of plastic, but still leaves the way clear for you to insert the front spring into place.
When you have the front spring in place you can push the spacer further in, to capture the front spring. You may need to wiggle or angle the spring slightly to let the spacer through.
Leave the spacer at a point that captures the front spring but does not block the opening for the rear spring.
Insert the rear spring and then push the spacer all the way into place, flush with the front and rear of the lever.
Now you can insert the bolt (with washer) into the space from the front of the lever, and you should have the new lever ready to install.
Place the lever into position on the extruder motor, and adjust it so that the bolt is lined up with the hole that it screws into, on the motor.
Tighten slowly, making sure that the lever is straight and is free to pivot, as you tighten the screw. Once sure it’s correctly installed, tighten the screw snugly.
Hook the two springs, starting with the rear one, over the hooks in the aluminum block.
It should now be ready to go.
If you are planning on printing ABS at all, then the most significant difference of all will be the PolyPrinter's closed cabinet. ABS really wants to curl up or crack and having a nice warm cabinet full of air around the part really helps. From the look of those other printers, I think the PolyPrinter's mechanical stiffness is better, which gives us a generally better quality-vs speed tradeoff. We do also formally support NinjaFlex and other material printing, and our head will go to higher temperatures (absolute maximum of 300C).
But our price point is at a completely different level than those other printers. In the end it comes down to how you want to spend your time.
The cheaper open air printers typically require more tweaking to keep them running well, and you will probably spend more time trying to work around the problems of printing out in the open. But you will definitely have a smaller financial outlay.
The question is whether the printer is meant to produce or enable a tangible financial or worthwhile benefit. For a business trying to bring a product to market, time can be so valuable that a PolyPrinter can pay for itself in one day (we've seen it happen). But for an individual with just a personal desire to do some cool things, it will not ever produce a tangible financial payback. Most situations are in-between those extremes.
If it's going to be pivotal to your full-time business, then having a printer that you can count on every day, where you are most likely to actually get a usable part from it every time, can trump the acquisition cost difference very quickly. You might even want the on-site service plan, to avoid even having to worry about issues that might come up. (Being mechanical devices, ALL printers need service at some point.) We also provide email and telephone support not just for printer issues, but for advice on slicing, materials, etc. if you have challenging applications.
But if you are just starting down a self-funded development path, part-time, and you don't mind working on or modifying a less-expensive printer, and time-to-market isn't a concern, then spending more time while saving your capital may be a better choice.
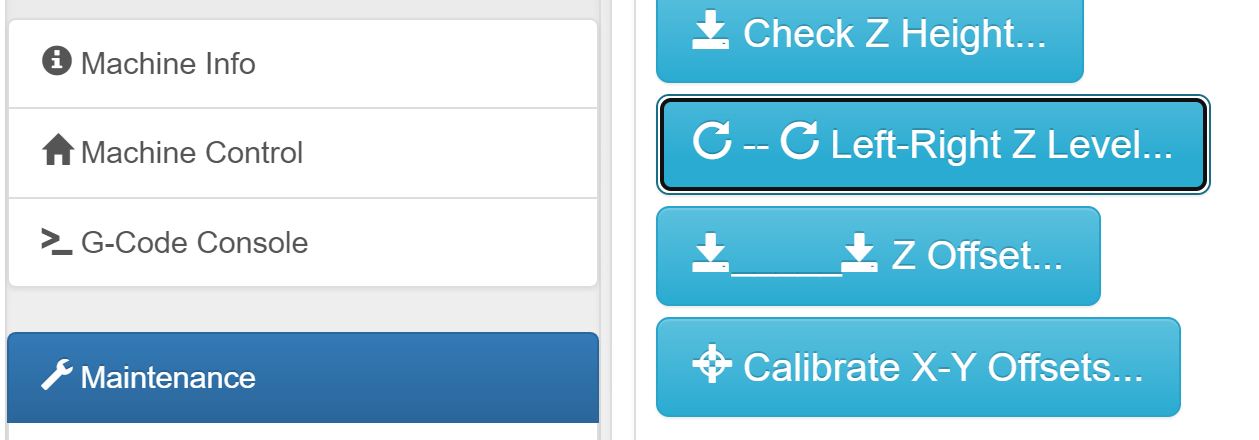
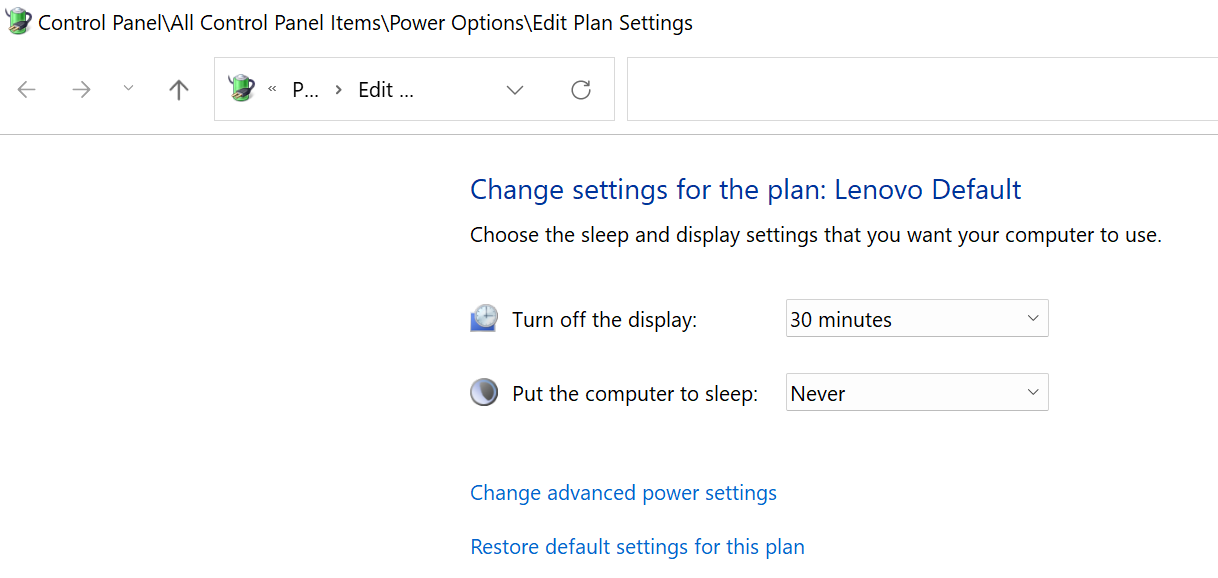
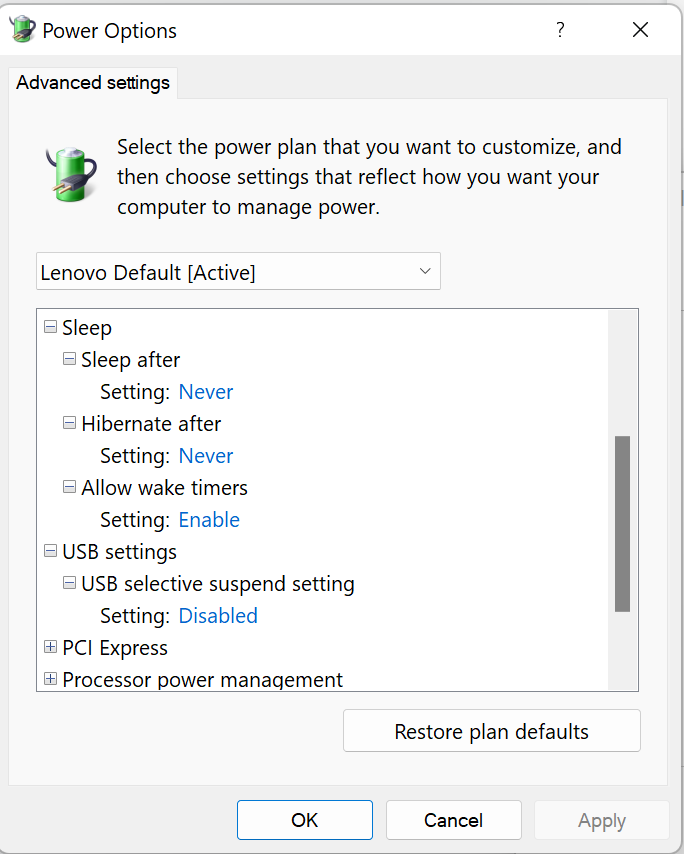
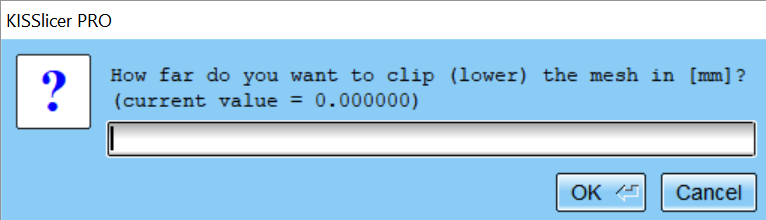
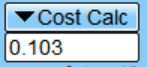
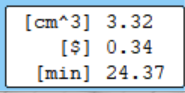


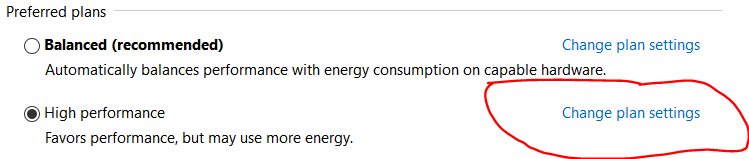
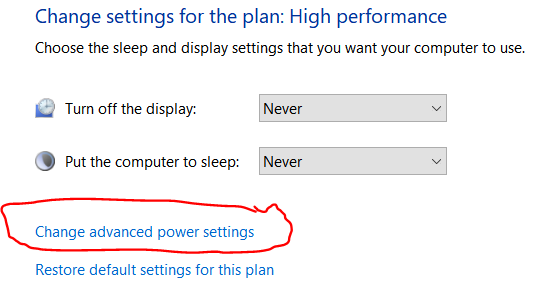
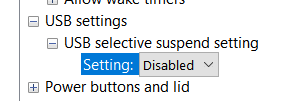

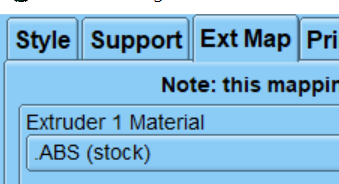
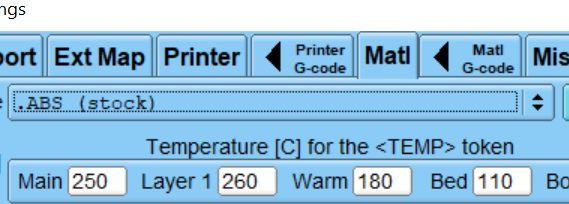
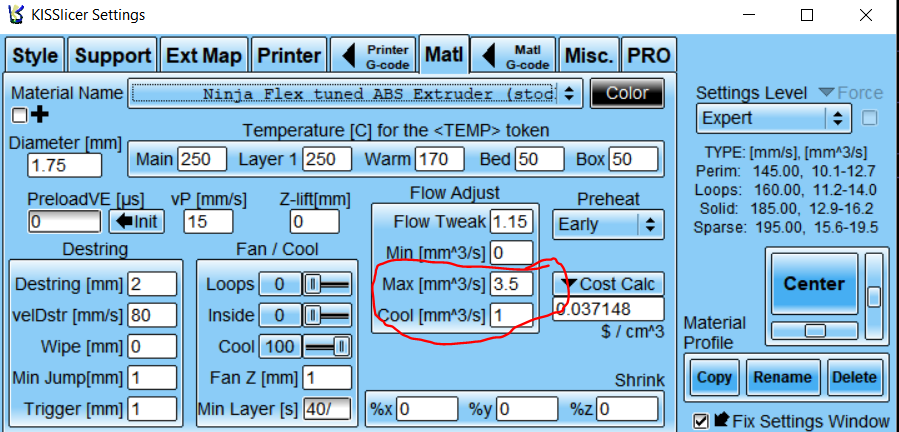
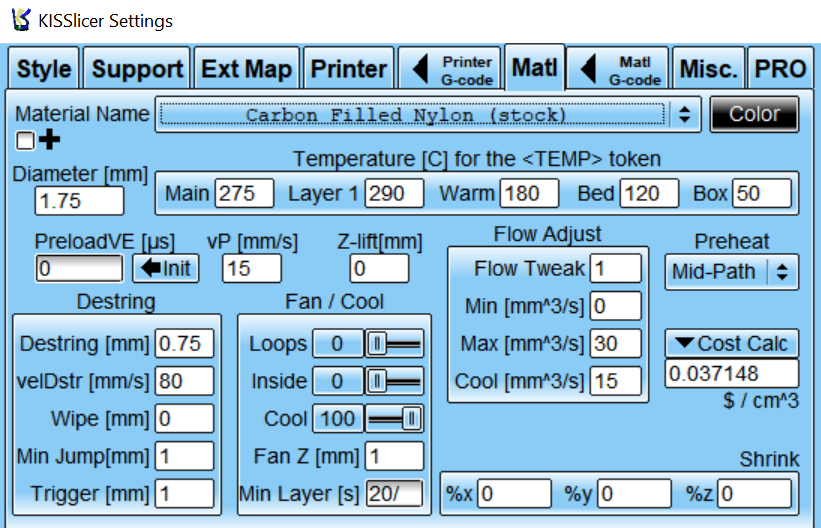
